
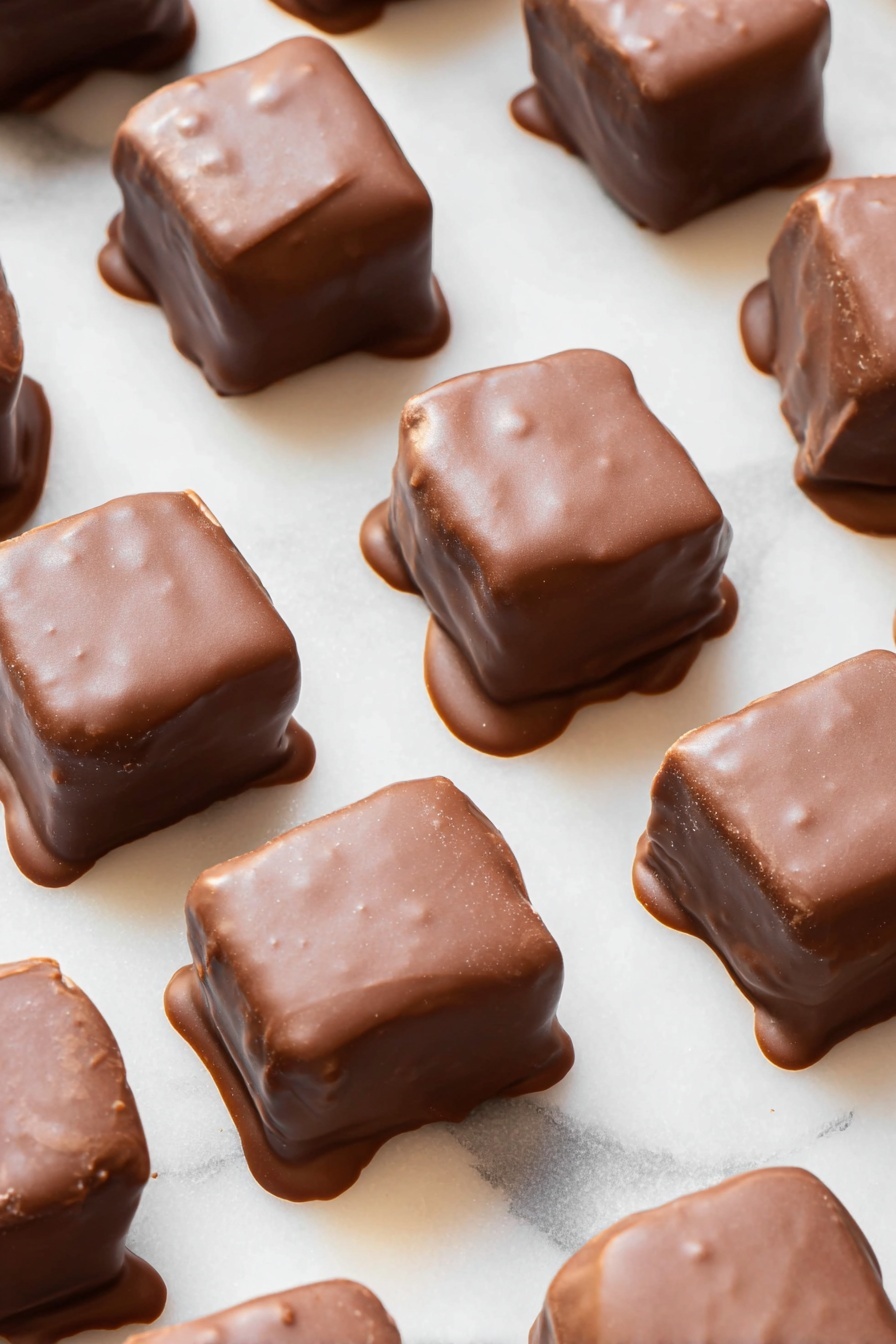
If you’re looking for a sweet, indulgent treat that’s easy to whip up without turning on your oven, you’re going to adore this No-Bake Whipped Topping Chocolate Candy Recipe. It’s one of those fan-freaking-tastic recipes that brings the magic of rich chocolate and fluffy whipped topping together into a melt-in-your-mouth candy that’s perfect for any occasion. Trust me, once you try this, you’ll find yourself making it over and over again!
Why You’ll Love This Recipe
- No Baking Required: Enjoy a luscious chocolate candy without heating up the kitchen or firing up the oven.
- Simple Ingredients: You probably already have these pantry staples on hand for an easy last-minute dessert.
- Crowd-Pleaser: This recipe yields a big batch perfect for parties, potlucks, or gifting to friends and family.
- Versatile Texture: Creamy, fluffy inside with a smooth chocolate coating — it’s candy heaven in every bite.
Ingredients & Why They Work
The magic of this No-Bake Whipped Topping Chocolate Candy Recipe lies in how simple components come together for a decadent experience. Each ingredient plays a special role — from the creaminess of the whipped topping to the silky chocolate coating that seals in all that fluff.
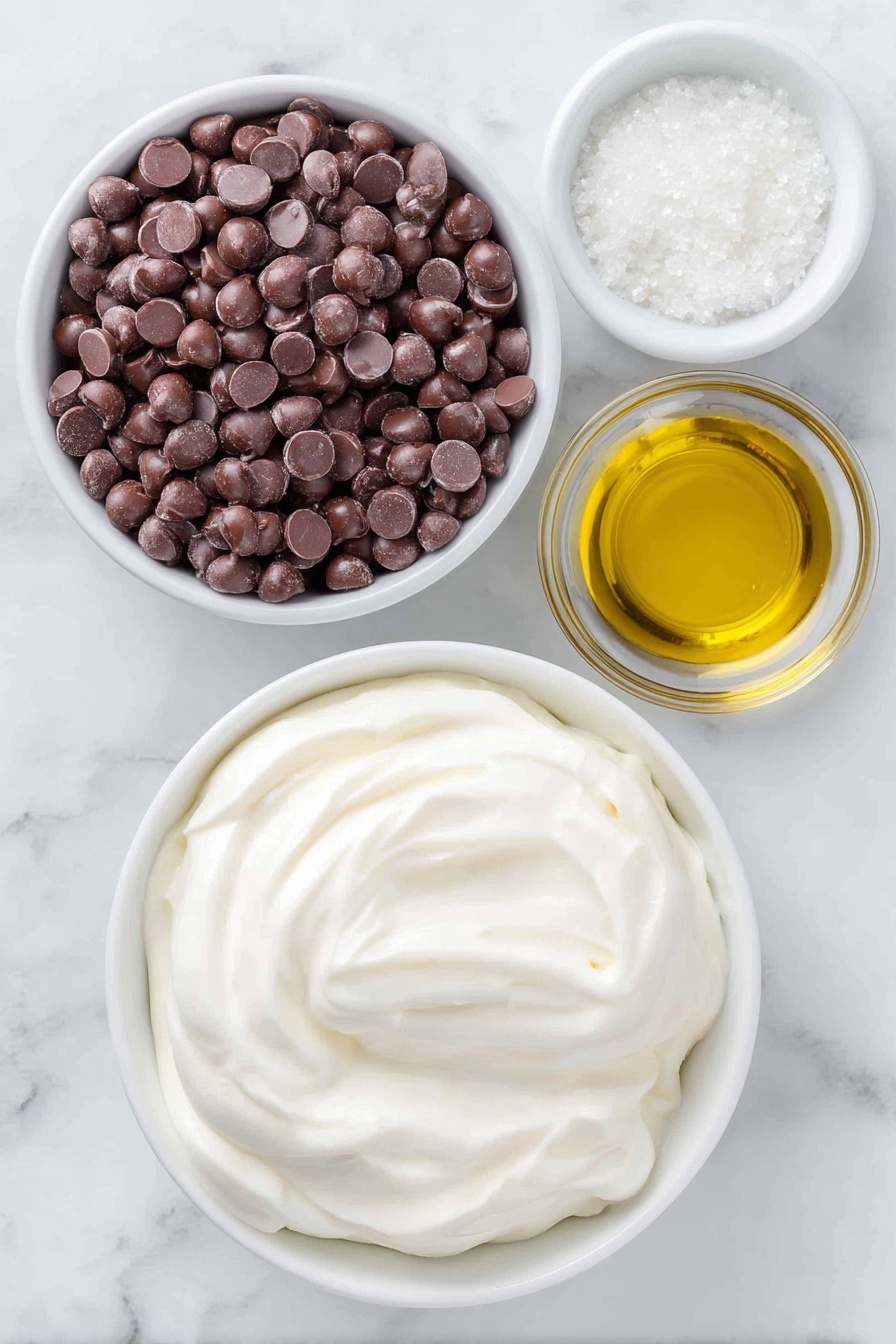
- Milk chocolate chips: These melt smoothly and bring that classic creamy chocolate flavor essential for the candy base.
- Frozen whipped topping (thawed): Adds a light, airy texture that makes this candy unique and keeps it from feeling dense.
- Ghirardelli chocolate melting wafers: Their perfect melting quality ensures a smooth, glossy coating that snaps just right when you bite in.
- Vegetable oil: Helps thin the chocolates for easy dipping and a beautifully shiny finish.
Make It Your Way
One of the things I love most about this No-Bake Whipped Topping Chocolate Candy Recipe is how flexible it is! I like to play around with the chocolate types or add a sprinkle of sea salt on top for contrast. Feel free to personalize it to match your taste or dietary needs.
- Darker Chocolate: I’ve swapped milk chocolate chips for semi-sweet or even bittersweet chocolate when I’m craving something less sweet—it totally changes the vibe and I love it!
- Flavor Add-Ins: Adding a teaspoon of vanilla extract or a pinch of cinnamon to the melted chocolate can add a delightful twist.
- Nuts or Sprinkles: Feel free to press crushed nuts or festive sprinkles on top before chilling for extra texture, especially during holidays.
- Dietary Mods: For dairy-free, try using coconut whipped topping and vegan dairy-free chocolate chips—I’ve had great success with this swap.
Step-by-Step: How I Make No-Bake Whipped Topping Chocolate Candy Recipe
Step 1: Prepare Your Pan and Melt the Chocolate Chips
I always start by lining an 8×8 pan with parchment paper so it’s easy to lift out the candy later—trust me, it saves a lot of cleanup. Next, place your milk chocolate chips in a microwave-safe bowl. Heat them on 50% power in one-minute bursts, stirring well in between. Once smooth, stir in 1 tablespoon of vegetable oil to get that glossy texture that makes the candy coating silky. Remember, patience is key here—don’t rush melting or you risk burning the chocolate.
Step 2: Fold in the Whipped Topping
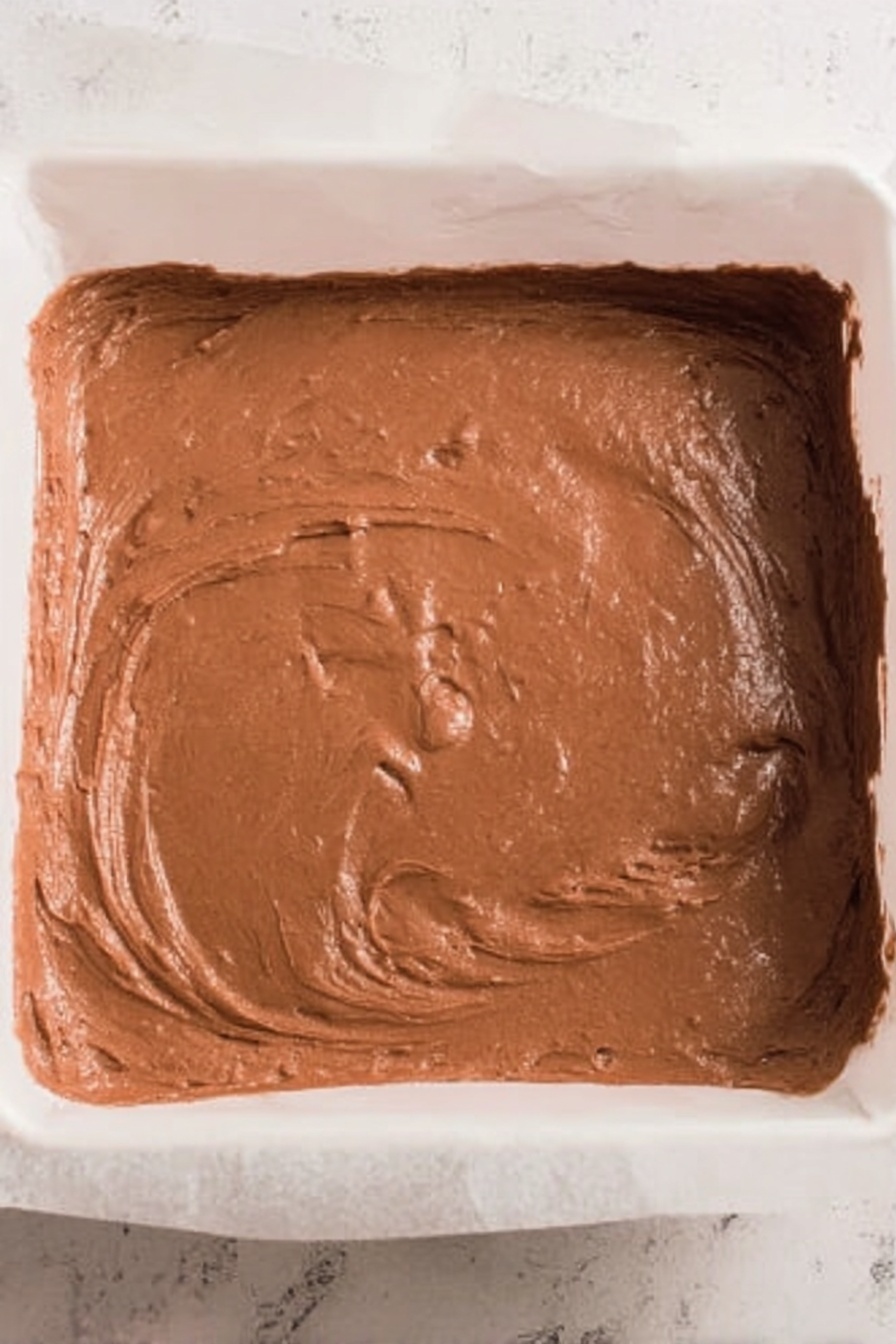
Once your chocolate is perfectly melted and smooth, add the thawed whipped topping. Stir gently but thoroughly with a flexible rubber spatula so the mixture blends fully into a thick, luscious batter. It’s so satisfying to see it come together! The whipped topping gives this candy that wonderful light texture that makes it feel like it melts on your tongue.
Step 3: Spread and Chill the Base
Carefully pour the chocolate and whipped topping mixture into your prepared pan, scraping down the sides to make sure nothing gets left behind (I always sneak a spoonful or two). Then press and smooth the mixture evenly to fill all corners and create a flat surface. Pop this into the fridge and let it chill for at least 6 hours or overnight. This part can be hard—you just want to dig right in—but the wait makes sure everything sets perfectly.
Step 4: Slice Into Pieces
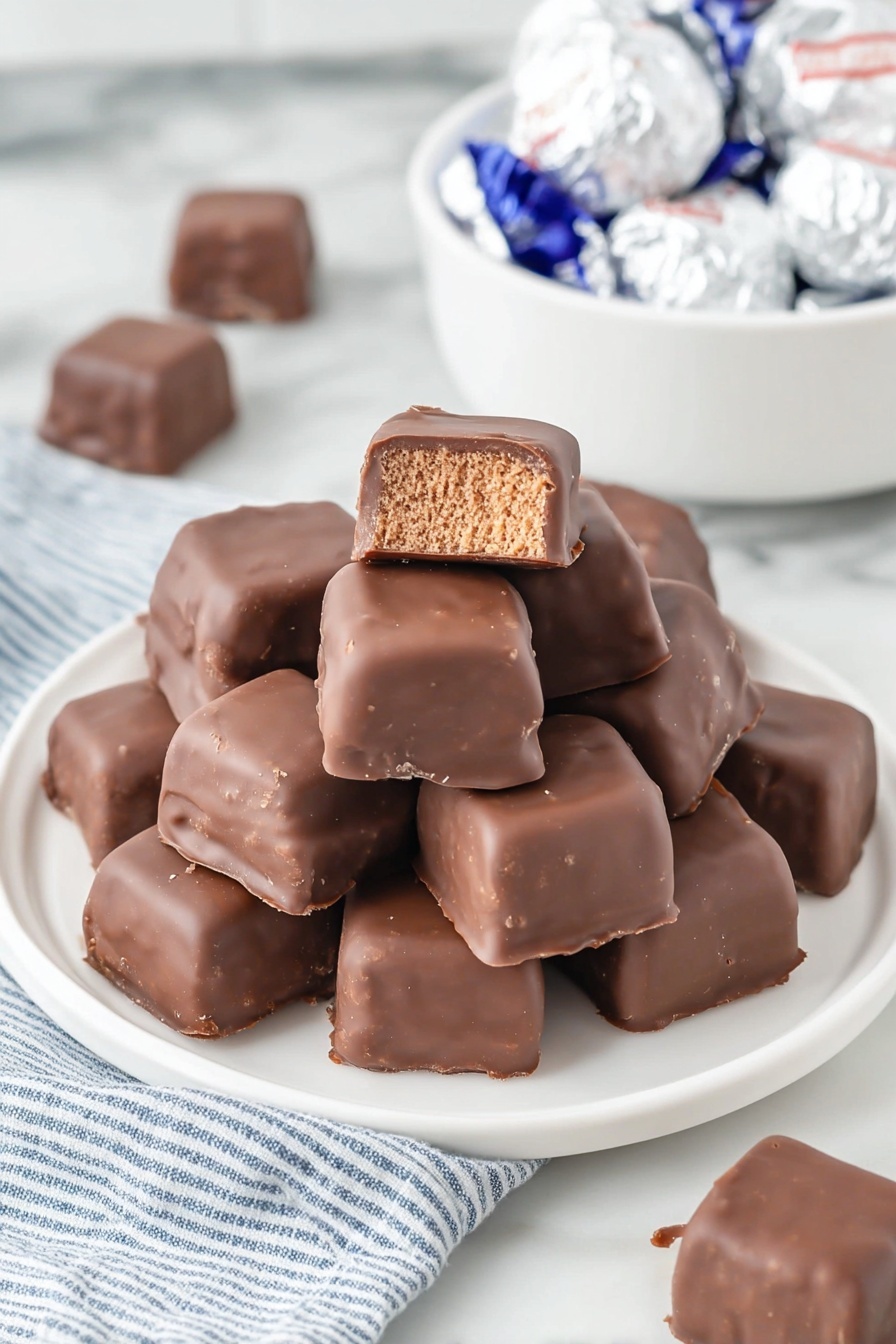
When chilled, lift the entire block out using the parchment edges (such an easy and neat trick). Use a sharp knife to cut about 5 slices across and 5 down so you get roughly 1½-inch squares. It helps to wipe your knife clean between cuts to keep things neat. Then lay each piece on a baking sheet and pop them back into the fridge while you get your coating ready.
Step 5: Melt the Coating Chocolate and Dip
Now melt your Ghirardelli chocolate wafers the same way you did the chips — 50% power in the microwave with 30-second intervals and stirring. Add the remaining tablespoon of vegetable oil for that glossy, easy-to-dip finish. Using two forks or dipping tools, coat each piece carefully in the melted chocolate, making sure to cover every edge. This step takes a little patience but the result is totally worth it.
Step 6: Final Chill and Serve
Place all your dipped candies back on the lined baking sheet and refrigerate for at least 30 minutes to set the chocolate coating. Once set, they’re ready to enjoy! Keep them chilled until serving for that classic texture and flavor.
Pro Tips for Making No-Bake Whipped Topping Chocolate Candy Recipe
- Don’t Rush the Chilling: Chilling between steps sets the texture perfectly; skipping this can make your candy too soft to handle.
- Use Parchment Paper: I never skip lining the pan—it makes lifting and slicing the candy so much easier and cleaner.
- Stir Chocolate Gently: Stir slowly as you melt chocolate to avoid graininess or overheating.
- Sharp Knife for Neat Cuts: Warm your knife under hot water and dry it before slicing to get clean cuts without cracking the candy.
How to Serve No-Bake Whipped Topping Chocolate Candy Recipe
Garnishes
My favorite way to garnish these candies is with a sprinkle of flaky sea salt or crushed peppermint candies during colder months—the salty or minty contrast really brightens the chocolate flavor. Sometimes, I also sprinkle on edible gold dust for a fancy touch when serving to guests.
Side Dishes
These candies are perfect on their own, but if you want to serve a little something on the side, I love pairing them with fresh berries or a small scoop of vanilla ice cream. The freshness and creaminess complement the rich chocolate deliciously.
Creative Ways to Present
For holiday parties or gift-giving, I like to place these candies in pretty mini cupcake liners or arrange them in a decorative box with tissue paper. A glass jar with a bow tied around it makes a pretty presentation, too! You can also zigzag some white chocolate drizzle over the finished candies for a fun pattern.
Make Ahead and Storage
Storing Leftovers
This candy stores beautifully in an airtight container in your refrigerator. I usually keep mine for up to 5-7 days, and honestly, I find it tastes best cold right from the fridge because of the texture.
Freezing
I’ve frozen these candies wrapped individually in plastic wrap and placed in a freezer-safe bag for up to 2 months. When you’re ready to enjoy, just thaw them overnight in the fridge, and they come back nearly as perfect as fresh.
Reheating
Because this candy is best served chilled, I don’t recommend reheating. Just pull some from the fridge a few minutes before serving if you want the flavor to soften slightly.
FAQs
-
Can I use homemade whipped cream instead of frozen whipped topping?
While homemade whipped cream sounds tempting, it tends to be less stable in this recipe and might make the candy too soft or cause it to weep. Using frozen whipped topping provides the right texture and consistency for the candy to set firm.
-
Can I substitute other types of chocolate?
Absolutely! Milk chocolate gives a sweeter, creamier flavor, but semi-sweet or dark chocolate can add a richer, less sweet profile. Just be sure your chocolate melts smoothly and use vegetable oil to help thin it out for dipping.
-
How long does this candy last?
Stored properly in an airtight container in the refrigerator, the candy keeps well for up to 7 days. For longer storage, freeze each piece tightly wrapped, and thaw in the fridge before serving.
-
Do I have to chill the candy for 6 hours?
Yes, chilling is essential. It allows the mixture to set fully and ensures the right texture when slicing and dipping. If you’re short on time, overnight chilling is best, but at minimum six hours helps the candy firm up.
Final Thoughts
This No-Bake Whipped Topping Chocolate Candy Recipe has become one of my absolute favorites to make for a crowd or just when I want a simple, indulgent treat without fuss. It’s approachable for any skill level and honestly feels so special every time you bite in. I hope you enjoy making and sharing it as much as I do—there’s something truly comforting about homemade candy that just warms you to the soul!
Print
No-Bake Whipped Topping Chocolate Candy Recipe
- Prep Time: 30 minutes
- Cook Time: 5 minutes
- Total Time: 6 hours 35 minutes
- Yield: 36 servings
- Category: Dessert
- Method: No-Cook
- Cuisine: American
Description
This Cool Whip Candy Recipe combines silky melted chocolate chips with whipped topping to create a rich, creamy base that is chilled and then coated with smooth chocolate wafers. The result is a luscious, bite-sized treat perfect for dessert or sharing at gatherings.
Ingredients
Base
- 11.5 ounces milk chocolate chips (one package)
- 8 ounces tub of frozen whipped topping, thawed at room temperature
- 1 tablespoon vegetable oil (for base)
Coating
- 10 ounces bag of Ghirardelli chocolate melting wafers
- 1 tablespoon vegetable oil (for coating)
Instructions
- Prepare Pan: Line an 8×8 inch pan with parchment paper to ensure easy removal of the candy later.
- Melt Base Chocolate: Place the milk chocolate chips in a large microwave-safe bowl. Microwave on 50% power for 1 minute, then stir well. Add 1 tablespoon vegetable oil and continue microwaving at 50% power in 30-second intervals, stirring between each, until the chocolate is silky smooth. Remove from microwave.
- Combine with Whipped Topping: Add the thawed whipped topping to the melted chocolate and stir thoroughly with a rubber spatula until fully combined and thick.
- Pour Into Pan: Scrape the mixture into the prepared 8×8 pan, using a spatula to gather all the mixture and spread it evenly, pressing it flush to the edges and corners to create a flat surface.
- Chill Base: Place the pan in the refrigerator and chill for 6 hours or overnight until firm.
- Cut Candy: Remove the chilled candy from the pan by lifting the parchment paper. Using a sharp knife, cut into 5 sections on each side, making approximately 1½ inch pieces (around 36 pieces).
- Prepare for Coating: Place each piece on a large baking sheet and keep refrigerated while you melt the coating chocolate.
- Melt Coating Chocolate: Place the Ghirardelli chocolate melting wafers in a microwave-safe bowl. Microwave on 50% power for 1 minute, stir well, add remaining 1 tablespoon vegetable oil, and continue microwaving at 50% power in 30-second intervals until smooth. Remove from microwave.
- Dip Candy: Using two forks or dipping tools, dip each candy piece into the melted chocolate completely, then return it to the baking sheet.
- Chill Coated Candy: Once all pieces are coated, place the baking sheet back into the refrigerator and chill for 30 minutes before serving.
Notes
- Store the candy in an airtight container in the refrigerator for 5 to 7 days. It is best enjoyed cold for the classic creamy texture.
- No reheating is needed; serve chilled straight from the fridge for optimal taste and texture.
- For longer storage, wrap each piece in plastic wrap and place in a freezer-safe bag. Freeze up to 2 months and thaw in the refrigerator before serving.
- Don’t skip chilling steps between preparing the base and coating to ensure proper texture and easy handling.
- Use parchment paper for easy removal of the candy slab from the pan.
Nutrition
- Calories: 155 kcal
- Sugar: 14 g
- Sodium: 15 mg
- Fat: 10 g
- Saturated Fat: 7 g
- Unsaturated Fat: 2 g
- Trans Fat: 0 g
- Carbohydrates: 16 g
- Fiber: 0 g
- Protein: 1 g
- Cholesterol: 3 mg


