
If you’re looking for a fun and flavorful treat that’s delightfully fresh and just a little bit playful, you’ve got to try this Cream Cheese Mint Cookies Recipe. It’s become one of my absolute favorites for sharing with friends during the holidays or just when I’m craving a sweet, minty surprise. These little cookies combine creamy, buttery goodness with a pop of vibrant color and that cool minty zing you never knew you needed. Stick around, because I’m going to walk you through everything so you can nail this recipe every single time!

Why You’ll Love This Recipe
- Easy to Make: The combination of cream cheese and powdered sugar whips up quickly with minimal ingredients and effort.
- Customizable Colors: You get to play with neon and classic food coloring for bright, fun cookies that look as great as they taste.
- Perfect Texture: These cookies have a soft, almost playdough-like feel that melts gently in your mouth without being sticky.
- Long Shelf Life: Store them in your fridge or freezer, and they’ll stay fresh for weeks to enjoy whenever the craving hits.
Ingredients & Why They Work
This Cream Cheese Mint Cookies Recipe shines because of its simple, high-quality ingredients that blend creaminess and sweetness with refreshing mint. The secret is really in using softened cream cheese and butter to get that perfect texture and flavor. Plus, having the right food coloring on hand lets you make these cookies pop visually, which is half the fun!
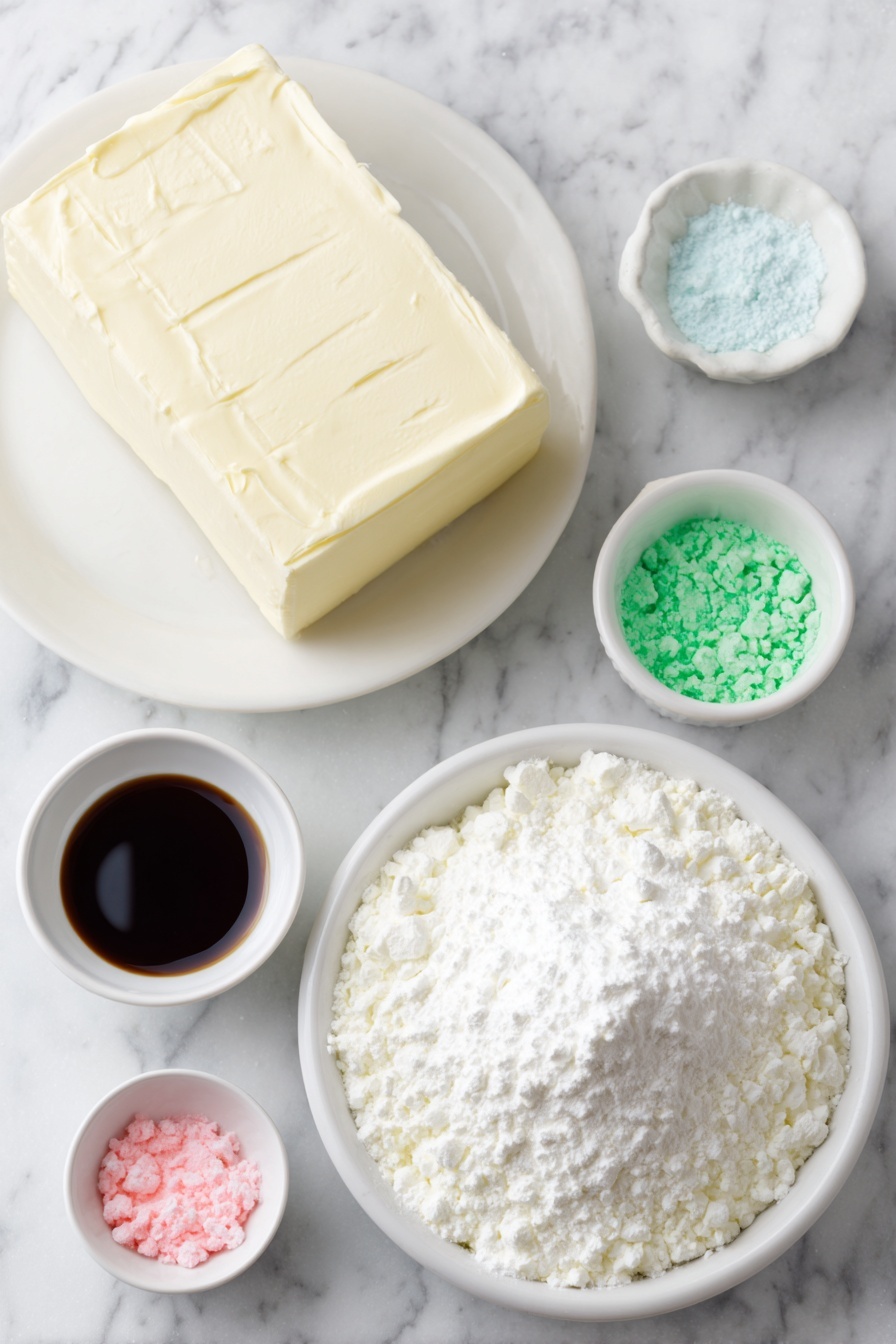
- Cream Cheese: Make sure it’s softened at room temperature so it blends smoothly and gives these cookies their signature tangy richness.
- Butter: Also softened, it adds depth and silkiness to the dough, balancing the cream cheese.
- Powdered Sugar: Gives that sweet, melt-in-your-mouth texture essential in bite-sized mint cookies.
- Mint Extract: Adds the refreshing mint flavor that really wakes up your palate, without being overpowering.
- Gel Food Coloring (Neon green, neon pink, classic blue): These colors brighten up the cookies and make them extra festive, especially for parties or holidays.
Make It Your Way
I love mixing up the colors every time I make these cookies! Once, I even tried using a peppermint extract instead of just mint, which gave the cookies a slightly sharper bite that was surprisingly delicious. Don’t be afraid to get creative with the intensity of the colors or try a different extract to match the season or your mood.
- Variation: Try omitting the colors for a classic white mint cookie, perfect for elegant parties or weddings.
- Dietary Modification: Substitute regular powdered sugar with a gluten-free version if needed; it doesn’t affect the texture much.
- Flavor Twist: Add a drop of vanilla extract along with mint for a subtle, layered flavor.
Step-by-Step: How I Make Cream Cheese Mint Cookies Recipe
Step 1: Blend Your Base Ingredients
Start by combining the softened cream cheese, butter, mint extract, and powdered sugar in a large bowl. I find using an electric hand mixer makes this step so much easier. Mix for about 3-4 minutes—at first, the dough is crumbly, and it might feel like you’re never going to get it together, but keep going. That’s totally normal!
Step 2: Knead to Perfect Texture
Once your mixer has done its job, set the dough aside briefly and start kneading by hand. This is where you’ll feel the dough transform into a soft, playdough-like ball. Don’t worry if it feels a little crumbly at first—kneading helps bring it all together. If it’s too dry, add one more tablespoon of cream cheese. You’re aiming for something pliable but not sticky.
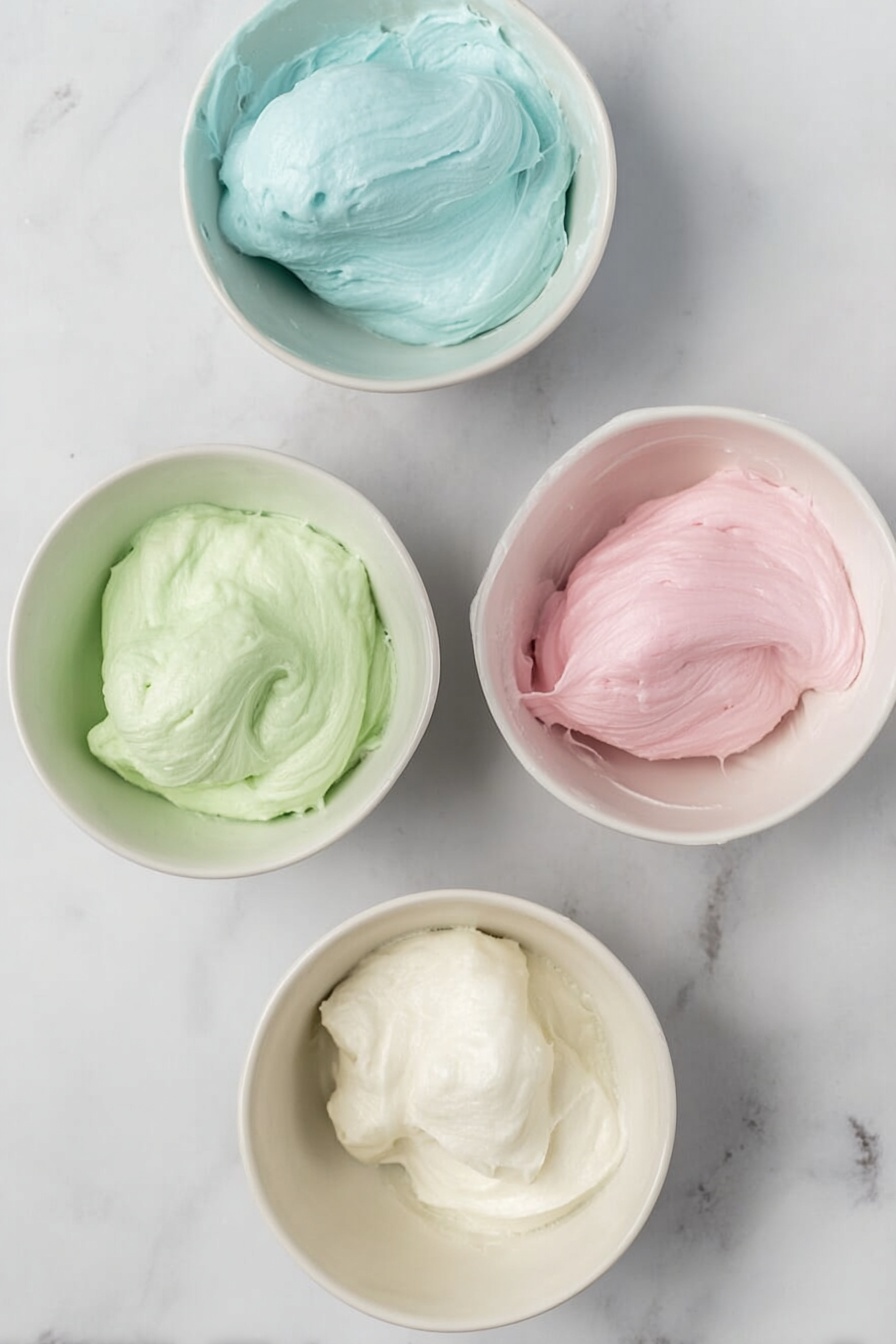
Step 3: Divide and Color Your Dough
Cut the dough ball into four equal parts. Place each in a small bowl. Leave one plain white and add 3-4 dots of your neon green, neon pink, and classic blue gel food coloring to the others. Fold and mix with your hands or a fork until the color is fully blended in. Remember to wash your hands between colors so they stay bright!
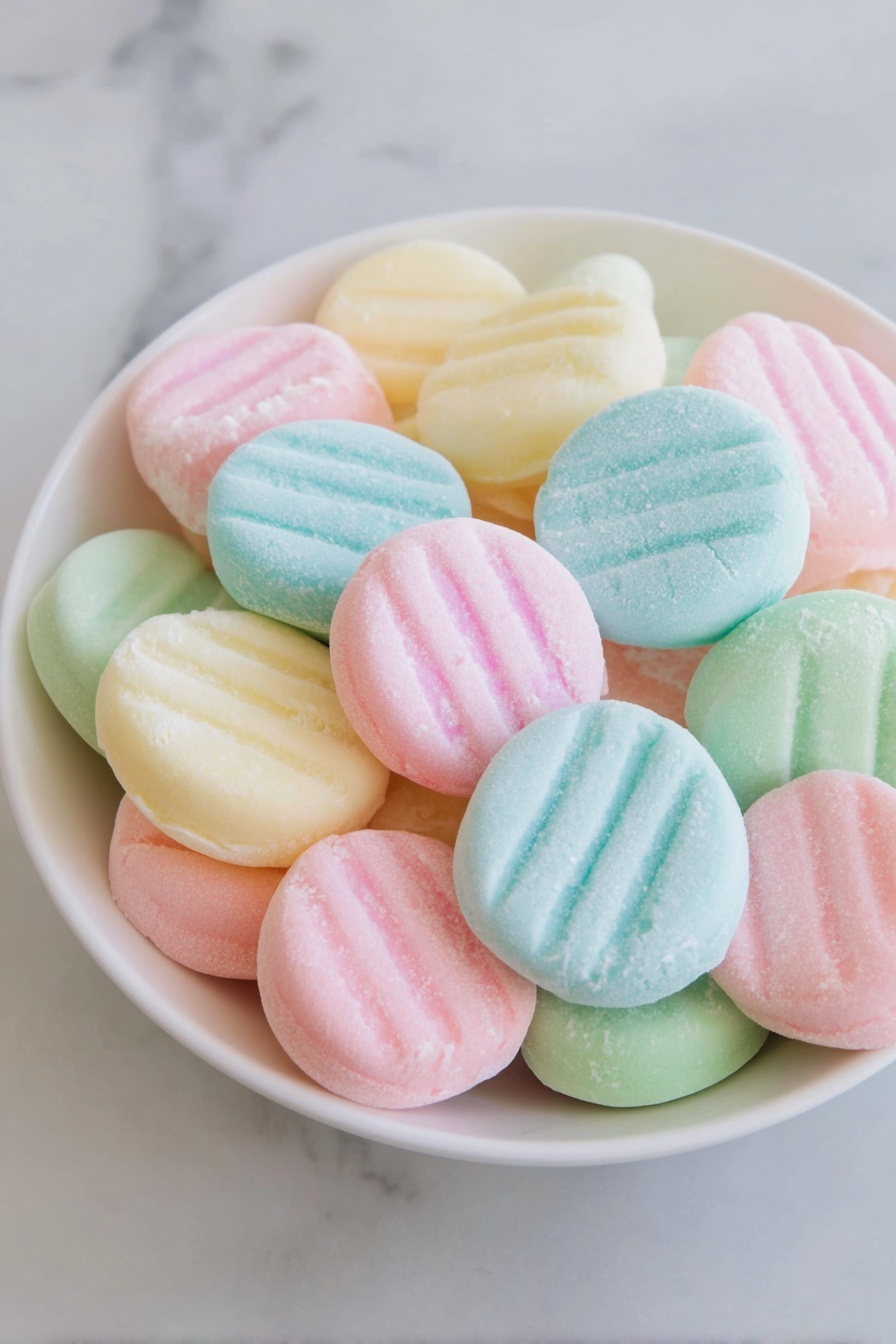
Step 4: Shape Your Mints
Roll teaspoon-sized balls from each color and place them on a parchment-lined baking sheet. Use a fork dipped in powdered sugar to press down on each ball gently, flattening it about halfway. This gives them that classic mint cookie look and adds a nice texture on top.
Step 5: Let Them Rest and Set
Patience is key here—you want to allow the cookies to rest at room temperature for 4-6 hours before digging in. This waiting time helps the flavors meld and the texture come together perfectly. It’s tough, I know, but trust me, it’s worth it!
Pro Tips for Making Cream Cheese Mint Cookies Recipe
- Softening is Everything: Always take cream cheese and butter out about an hour before you start so they blend smoothly and avoid lumps.
- Kneading Magic: Don’t skip the hand kneading—it helps get the perfect dough consistency that mixers alone can’t achieve.
- Color Care: Use gel food coloring instead of liquid; it won’t alter the dough texture and gives vibrant colors every time.
- Chill Awareness: Letting the mints rest at room temperature is essential—don’t rush this or the texture won’t set right.
How to Serve Cream Cheese Mint Cookies Recipe
Garnishes
I usually keep these simple and elegant with just the fork marks on top, but sometimes sprinkle a tiny bit of edible glitter or crushed peppermint candy for festive occasions. It adds a bit of sparkle and crunch without overpowering the soft texture.
Side Dishes
These mint cookies pair really well with a hot cup of peppermint tea or a rich dark coffee. I’ve also served them alongside a scoop of vanilla ice cream for an indulgent dessert plate that people rave about.
Creative Ways to Present
For special occasions, I arrange these cookies in a colorful spiral on a platter or package them in clear cellophane bags tied with mint-green ribbons. Kids love them at birthday parties, and they make fantastic homemade holiday gifts!
Make Ahead and Storage
Storing Leftovers
If you end up with extras (and you probably will!), store your Cream Cheese Mint Cookies Recipe creations in an airtight container in the fridge. They keep beautifully for up to 2 weeks, maintaining their freshness without drying out.
Freezing
I love prepping these ahead for holiday gifting, so I freeze them in layers separated by parchment paper inside freezer bags or containers. When thawed in the fridge overnight, they taste just as fresh as the day I made them.
Reheating
No need to reheat these cookies since they’re best enjoyed chilled or at room temperature. If you prefer to serve them just slightly softer, remove from the fridge 15 minutes before serving.
FAQs
-
Can I use any type of mint extract for this recipe?
Yes! Any quality mint extract works well here, but I recommend pure mint extract over artificial for the best flavor. If you want a stronger peppermint kick, you can experiment with peppermint extract—but start with less since it’s more potent.
-
What if my dough is too sticky or too crumbly?
If your dough feels sticky, try adding a little more powdered sugar or refrigerate it briefly before shaping. If it’s too crumbly, knead in an extra tablespoon of softened cream cheese. The goal is a smooth, pliable dough like playdough—not sticky or dry.
-
Can I make these cookies ahead of time?
Absolutely! These mints keep well in the fridge for up to two weeks and freeze beautifully. Just be sure to store them airtight and separate layers with parchment if freezing.
-
Do I have to use gel food coloring?
Gel food coloring is best since it provides vibrant colors without altering the dough’s texture. Liquid food coloring might make your dough too soft or wet, so I avoid it here.
Final Thoughts
This Cream Cheese Mint Cookies Recipe has been one of those happy finds that I keep coming back to, especially when friends drop by unexpectedly or during the busy holiday season. They’re simple yet impressive, easy to make but special enough to gift. I promise once you try them, you’ll want to keep the colors bright and the minty flavor fresh for every occasion. So, go ahead—mix up a batch, share them around, and enjoy the smiles they bring!
Print
Cream Cheese Mint Cookies Recipe
- Prep Time: 10 minutes
- Cook Time: 0 minutes
- Total Time: 6 hours 10 minutes
- Yield: 40 servings
- Category: Dessert
- Method: No-Cook
- Cuisine: American
Description
Delicious homemade cream cheese mints with a smooth, creamy texture and vibrant neon colors. Perfect for a refreshing treat or festive party favor, these mints combine cream cheese, butter, powdered sugar, and mint extract into colorful bite-sized delights.
Ingredients
Main Ingredients
- 4 ounces cream cheese softened to room temperature
- 1 tablespoon butter softened
- 4 cups powdered sugar
- ½ teaspoon mint extract
Food Coloring
- Neon green gel food coloring
- Neon pink gel food coloring
- Classic blue gel food coloring
Instructions
- Mix Ingredients: Add cream cheese, butter, mint extract, and powdered sugar into a large mixing bowl.
- Blend Mixture: Use an electric hand or stand mixer to blend for 3-4 minutes until the mixture becomes very crumbly.
- Knead Dough: Put the mixture aside and continue mixing by hand, kneading it into a round ball form.
- Divide Dough: Using a sharp knife, cut the dough ball into 4 equal portions and place each portion into separate small mixing bowls.
- Add Food Coloring: Add 3-4 dots of neon green, neon pink, or classic blue gel food coloring to three bowls, leaving one bowl white. Fold in the coloring by hand or with a fork until fully blended.
- Prepare Baking Sheet: Line a large baking sheet with parchment paper for the mints.
- Shape Mints: Roll teaspoon-sized balls from each colored dough and place them on the baking sheet.
- Flatten Mints: Dip a fork in powdered sugar and press it onto each ball, flattening them halfway down to form mint shapes.
- Rest Mints: Allow the mints to rest at room temperature for 4-6 hours before serving to set properly.
Notes
- Store cream cheese mints in an airtight container in the refrigerator for up to 2 weeks.
- Freeze mints in airtight containers or freezer bags for several months; separate layers with parchment paper and thaw in the fridge before serving.
- Use both neon and traditional gel food colorings to achieve vibrant colors.
- Ensure butter and cream cheese are truly softened for best texture.
- If mixture feels sticky, add 1 additional tablespoon of cream cheese.
- Wash hands between kneading different colored doughs to avoid color mixing.
- The mixture will feel crumbly initially, but after kneading it should have a playdough-like consistency.
Nutrition
- Calories: 55 kcal
- Sugar: 14 g
- Sodium: 2 mg
- Fat: 0 g
- Saturated Fat: 0 g
- Unsaturated Fat: 0 g
- Trans Fat: 0 g
- Carbohydrates: 14 g
- Fiber: 0 g
- Protein: 0 g
- Cholesterol: 1 mg


