
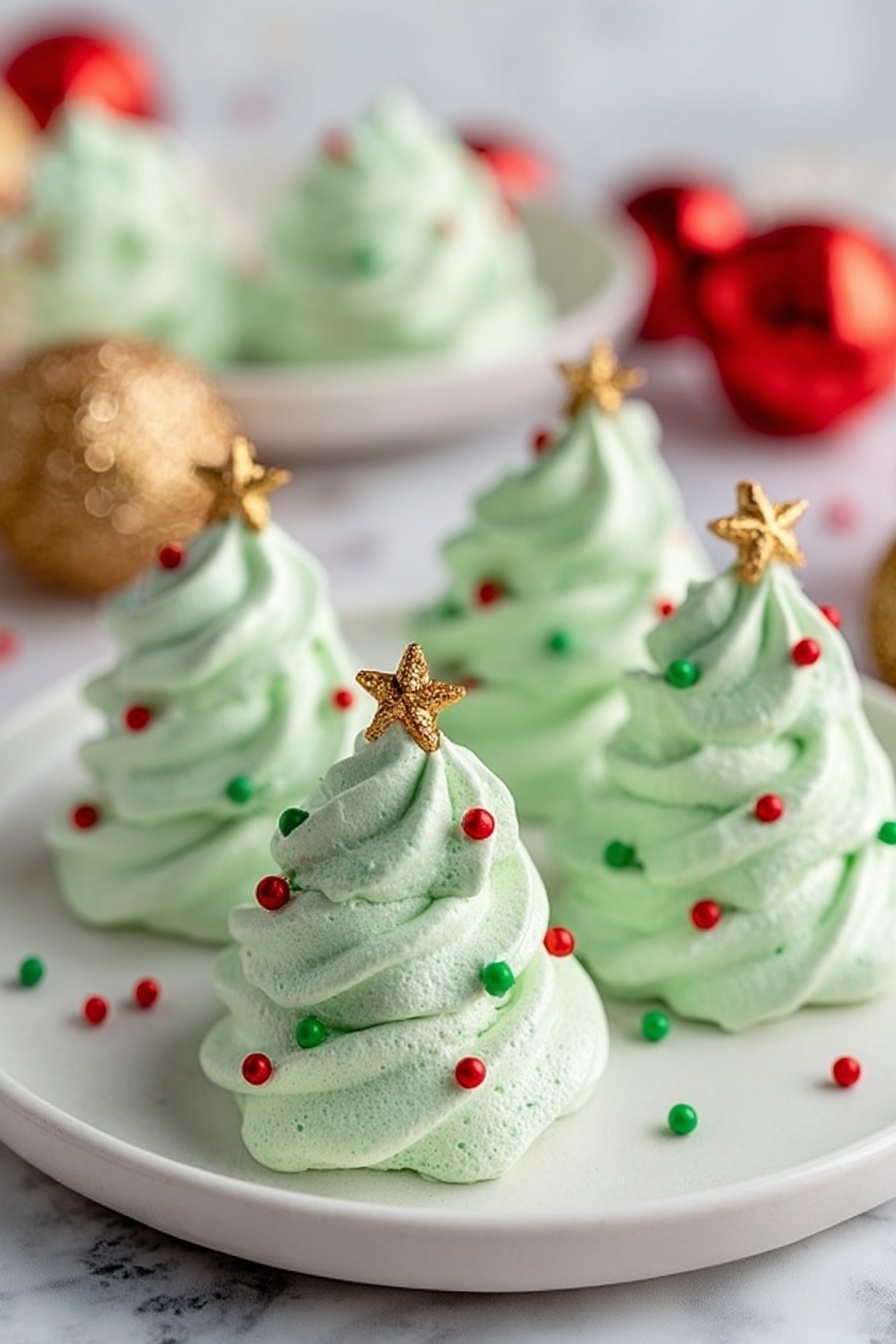
If you’re on the hunt for a festive treat that’s as fun to make as it is to eat, you’re going to adore this Christmas Tree Meringue Cookies Recipe. These light, crisp little clouds shaped like evergreen trees bring the magic of the holidays right into your kitchen. I’ve whipped up these charming cookies every season, and trust me—they’re as delightful to decorate as they are to snack on. Stick with me, and I’ll walk you through every step so your meringues turn out picture-perfect and absolutely delicious!

Why You’ll Love This Recipe
- Festive and Fun: These cookies instantly bring holiday cheer with their cute tree shape and colorful sprinkles.
- Light and Crispy: The meringues melt in your mouth without being overly sweet or heavy.
- Simple Ingredients: With just egg whites, sugar, and a splash of vanilla, you probably have everything you need already.
- Make-Ahead Friendly: These cookies keep well for days—perfect for prepping early before holiday parties.
Ingredients & Why They Work
Each ingredient in the Christmas Tree Meringue Cookies Recipe does its part to create that perfect snowy green tree look and delicate crunch. Choosing quality ingredients like fresh, room-temperature egg whites and pure vanilla makes a noticeable difference in your final cookies. Here’s a quick rundown of what I use and why.

- Egg whites: Make sure they’re at room temperature for better volume and stiffer peaks—cold whites just don’t whip up as well.
- Cream of tartar: This little acid stabilizes your egg whites, helping the meringue hold its shape during baking.
- Granulated sugar: Added gradually, it dissolves fully into the foam, providing structure and that glossy shine you want in meringues.
- Vanilla extract: Simple but essential—it adds a subtle warmth and rounds out the sweetness.
- Green gel food coloring: Gel color is key here because it won’t thin out the meringue mix like liquid food coloring might.
- Round and star sprinkles (optional): These make your meringue Christmas trees look extra festive—like little ornaments and star toppers!
Make It Your Way
One of the joys of the Christmas Tree Meringue Cookies Recipe is that you can make it truly your own. I love adding little edible glitter for a snowy sparkle or swapping green food coloring for pastel hues for a whimsical twist. Don’t hesitate to get creative—these cookies are as much about festive fun as they are about flavor.
- Variation: I once made these cookies with peppermint extract instead of vanilla, and the minty flavor was a huge hit at my holiday brunch. Try it if you’re a peppermint fan!
- Dietary: These cookies are naturally gluten-free and dairy-free, so they fit nicely into many diets.
- Difficulty: If you’re new to meringues, just take your time beating the egg whites and adding sugar slowly—it’s easier than it looks.
Step-by-Step: How I Make Christmas Tree Meringue Cookies Recipe
Step 1: Prep your oven and tools carefully
First things first, preheat your oven to a low 200°F (about 93°C) and line two baking sheets with parchment paper. I like to make sure my parchment is super flat because uneven surfaces can make those dainty meringue trees wobble and flatten out—something you definitely want to avoid when aiming for tall, pointy trees.
Step 2: Whip egg whites to frothy perfection
Add your room-temperature egg whites along with cream of tartar to your clean mixing bowl. I can’t stress enough how important it is that your bowl and whisk are completely clean and dry—any grease or moisture can prevent your meringue from reaching stiff peaks. Beat on medium speed until the mixture becomes frothy and airy. This usually takes about 2-3 minutes.
Step 3: Gradually add sugar and build glossy peaks
Now the magic happens. Start adding granulated sugar one tablespoon at a time while beating continuously. This slow addition helps the sugar dissolve fully, which is key for a smooth, shiny meringue that holds its shape. After all the sugar’s in, crank your mixer to high and beat until stiff, glossy peaks form—if you gently pull the whisk out, the meringue should stand straight up without drooping.
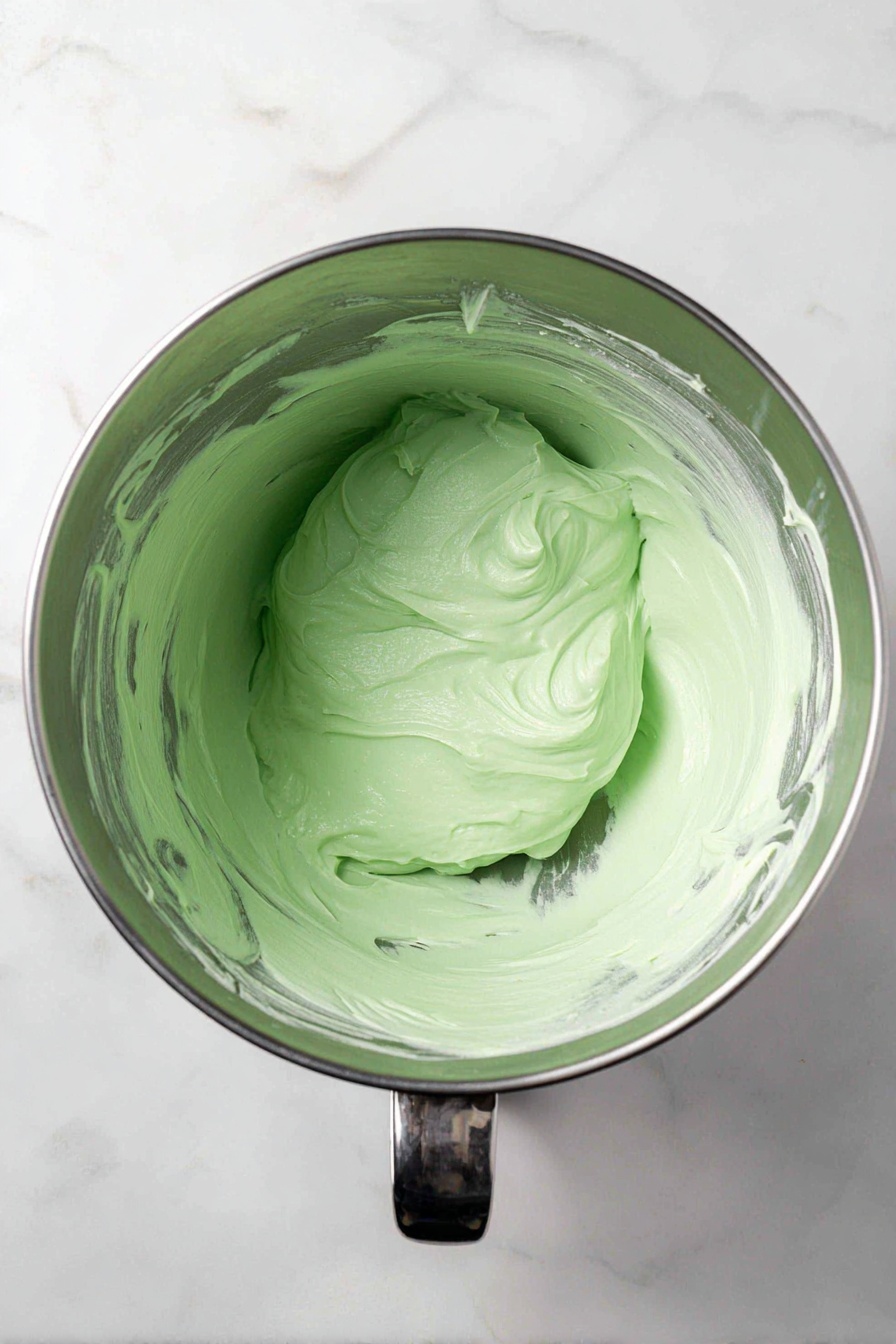
Step 4: Flavor and color the meringue
Beat in the vanilla extract just until combined—don’t overmix after adding it or you might deflate those lovely peaks. Then blend in your green gel food coloring a little at a time until you get that perfect pine-tree shade. Gel coloring is great because it won’t water down the meringue. I usually start with just a pea-sized dot and add more as needed.
Step 5: Pipe your trees and add festive decorations
Transfer the meringue mixture into a piping bag fitted with a large star tip (I love using a Wilton 1M for those classic swirls). Pipe tall, pointed swirls directly onto your parchment-lined sheets, spacing them about an inch apart to give them room to dry. If you want, sprinkle on round “ornaments” and top each tree with a star sprinkle for that extra holiday pizzazz.
Step 6: Bake low and slow, then cool with patience
Bake at 200°F for 45 minutes—low and slow is the name of the game here. Then, turn off the oven but don’t open the door! Let the meringues cool inside for at least 2 hours, preferably overnight. This gentle drying process keeps them crisp without cracking. Opening the oven could introduce humidity or rapid temperature changes that ruin your delicate cookies.
Pro Tips for Making Christmas Tree Meringue Cookies Recipe
- Room Temperature is Key: I always separate my eggs a day ahead and let the whites sit at room temp; it’s a game-changer for volume.
- Clean Equipment Only: After a few failed batches, I learned to scrub and dry my mixing bowls and whisk attachment thoroughly every time to avoid grease ruining the meringue.
- Slow Sugar Addition: Adding sugar too fast can leave gritty meringues, so patience pays off here.
- No Peeking: Resist the urge to open the oven during cooling—my first batch cracked because I didn’t wait!
How to Serve Christmas Tree Meringue Cookies Recipe
Garnishes
I love adding edible glitter or shimmer dust over the trees after baking for a frosty sparkle that catches the light just so. Colored sugar crystals can add extra whimsy, and sometimes I swap out the sprinkles for tiny edible pearls, which look like little snowballs on the branches.
Side Dishes
These meringue trees are perfect alongside a warm cup of cocoa or spiced tea. They also make a lovely contrast next to richer desserts like chocolate ganache tartlets or creamy pumpkin pie—light, crisp, and sweet pairing beautifully with something dense and creamy.
Creative Ways to Present
For holiday parties, I like to arrange the Christmas Tree Meringue Cookies Recipe on a tiered cake stand with sprigs of fresh rosemary or pine needles tucked around for a woodland vibe. Wrapping them up in cellophane tied with a festive ribbon also makes for an adorable cookie gift that guests always appreciate.
Make Ahead and Storage
Storing Leftovers
I keep my leftover meringue cookies in an airtight container at room temperature, tucked away in a cool, dry spot. They stay crisp and delicious for up to five days. Avoid leaving them out where humidity lingers, like near a stove or dishwasher, as moisture will soften them quickly.
Freezing
I’ve tried freezing meringues before, but honestly, it doesn’t work well. The moisture from thawing makes them soggy and chewy instead of crisp. This recipe truly shines fresh or stored at room temp, so I recommend making just the right amount or gifting extras.
Reheating
These cookies don’t need reheating since they’re best eaten crisp and fresh. If you want to refresh them after a couple of days, you can pop them into a warm oven (about 200°F) for just 5-10 minutes to dry them out a bit, but watch closely so they don’t brown.
FAQs
-
Can I make these Christmas Tree Meringue Cookies Recipe without a mixer?
While it’s technically possible to whip egg whites by hand with a whisk, it’s really tough to reach the stiff peaks and volume needed for these meringues. Using a stand or hand mixer saves a ton of time and effort, so I highly recommend it for reliable results.
-
Why are my meringues sticky after baking?
Sticky meringues usually mean the sugar didn’t dissolve fully or the meringues didn’t dry out properly in the low-temperature oven and cooling phase. Make sure you add sugar gradually and let the cookies cool completely in the turned-off oven without opening the door.
-
Can I make these without cream of tartar?
Cream of tartar helps stabilize the egg whites and prevents them from collapsing, but if you don’t have it you can substitute with a few drops of lemon juice or white vinegar. Just add it at the beginning with the egg whites, and your meringues should still turn out great.
-
What’s the best way to color the meringue green?
I recommend using gel food coloring because it won’t thin the meringue mixture. Add it gradually after the meringue is whipped to stiff peaks to get your desired shade of green without compromising texture.
Final Thoughts
This Christmas Tree Meringue Cookies Recipe has a special spot in my holiday heart—it’s simple but feels fancy, and it always brings smiles at my family gatherings. The process is surprisingly peaceful, piping and decorating those little green trees while holiday music plays. If you want a dessert that doubles as a charming decoration and tastes like a cloud of festive joy, give this recipe a try. I can’t wait to hear how your batch turns out!
Print
Christmas Tree Meringue Cookies Recipe
- Prep Time: 20 minutes
- Cook Time: 45 minutes
- Total Time: 3 hours 5 minutes
- Yield: 30 servings
- Category: Dessert
- Method: Baking
- Cuisine: American
- Diet: Vegetarian
Description
Delightful and festive Meringue Christmas Trees made with airy whipped egg whites tinted green and decorated with sprinkles, perfect for holiday celebrations. These crisp and sweet treats are light, visually stunning, and easy to prepare with straightforward ingredients.
Ingredients
Meringue Mixture
- 4 large egg whites room temperature
- ¼ teaspoon cream of tartar
- 1 cup granulated sugar
- 1 teaspoon vanilla extract
- Green gel food coloring to desired shade
Decorations
- Round sprinkles optional
- Star sprinkles optional
Instructions
- Preheat Oven: Preheat your oven to 200 degrees Fahrenheit and line two baking sheets with parchment paper to prevent sticking.
- Beat Egg Whites: Place the room temperature egg whites and cream of tartar in a clean, dry stand mixer bowl. Beat on medium speed with the whisk attachment until frothy.
- Add Sugar Gradually: Slowly add the granulated sugar, one tablespoon at a time, while continuing to beat. Increase speed to high and beat until the mixture forms stiff, glossy peaks and the sugar is fully dissolved.
- Incorporate Vanilla: Gently beat in the vanilla extract just until combined to add subtle flavor.
- Add Color: Mix in the green gel food coloring thoroughly until you achieve your desired shade of green for the meringue.
- Pipe Trees: Transfer the meringue mixture to a piping bag fitted with a large star tip (such as Wilton 1M). Pipe tall swirling shapes on the prepared baking sheets in the form of Christmas trees, spacing each about 1 inch apart.
- Decorate: Optionally add round sprinkles as ornaments and place star sprinkles on top of each meringue tree for a festive look.
- Bake and Cool: Bake the meringue trees for 45 minutes at 200°F. Then turn off the oven and allow them to cool inside the oven for at least 2 hours or preferably overnight without opening the oven door to ensure they dry properly.
- Store: Once completely cooled, store the meringues in an airtight container at room temperature to keep them crisp.
Notes
- Store meringues in an airtight container at room temperature up to 5 days, keeping them in a cool, dry place away from humidity.
- Reheating is not recommended as meringues are best served crisp and fresh.
- Freezing is discouraged because moisture from freezing ruins the delicate texture.
- For best volume and stability, use room-temperature egg whites and ensure your mixing equipment is clean and dry.
- Add sugar gradually to allow for full dissolution and achieve a glossy, stiff peak meringue.
- Pipe meringues on parchment paper for easy removal after baking.
- Do not open the oven door during the cooling phase inside the oven to prevent cracking and maintain structure.
Nutrition
- Calories: 41 kcal
- Sugar: 10 g
- Sodium: 2 mg
- Fat: 0 g
- Saturated Fat: 0 g
- Unsaturated Fat: 0 g
- Trans Fat: 0 g
- Carbohydrates: 10 g
- Fiber: 0 g
- Protein: 1 g
- Cholesterol: 0 mg


